 A clogged toilet is one of the unavoidable issues that every one of us needs to confront at one point or other. The least demanding answer for this issue is to call a handyman. However a handyman in any assembled states will set you back by no less than 100$. Not an extraordinary prospect on the off chance that you can help it.
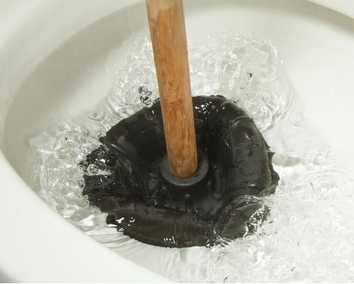
Luckily more often than not, managing stopped up toilets is not an exceptionally troublesome assignment. It is conceivable to unclog a toilet through a few techniques yet utilizing a plunger is a standout amongst the best and simple strategies. The initial phase in unclogging the toilet with a plunger is to choose the correct toilet plunger. The vast majority commit the error of utilizing a sink plunger to clean a toilet, without understanding that it is not sufficiently solid to make a suction of required quality. While acquiring a plunger from any tool shop, ensure that the rubber band is a solid one. There are some different elements to check while purchasing the plunger is the state of the rubber and nearness of a solid edge around the rubber band. The nature of the edge around the rubber band is critical as it decides the quality of the suction made by it. At last run for a plunger with a few feet long handle. To clean the toilet appropriately, put the rubber end of the plunger on the toilet opening. Guarantee that the rubber covers the opening totally and at any rate half of it is secured by water. Hold the flip side of the handle with hand and push it down. Move it up once more. Keep on moving the handle all over various circumstances to make a sufficiently solid suction. This procedure should be proceeded for fifteen to twenty minutes to get the best outcomes. Evacuate the plunger totally away in one quick movement. Ideally the stop up would have been cleaned and the water will begin streaming out. In the event that the water is still stuck in the toilet, then rehash the procedure everywhere. This whole procedure of diving over and over might be excessively exhausting. That is the reason I want to play my most loved music before beginning this assignment. It is a smart thought to flush the toilet completely when the stop up is gone. This will tidy up the toilet and make it prepared for crisp utilize. Take care to maintain a strategic distance from the utilization of korky plunger subsequent to applying any sort of substance to clean the toilet. On the off chance that the stopping up is not settled even in the wake of diving for various circumstances, then you ought to go for an expert handyman as opposed to squandering additional time attempting to take care of the issue yourself.
0 Comments
 The water pressure is low?… Don't worry – low water pressure could be brought on by either poor group water supply from the region, or by gravity. The tallness of your building could make you lose water pressure, as 0.434 psi is lost with each foot water is pushed up, and you will along these lines lose around 8 psi in a twofold story house when you attempt to pump water from the cellar to the lavatory on the second floor. Today we will disclose to you the advantages of, and how to introduce a Well Pump Pressure Tank. Which Buildings Will Benefit From a Booster Pump? Houses toward the end of the water supply line. Homes high over the supply line. Tall multi-family private properties. You will likewise require a water pressure promoter pump on the off chance that: Including new pipes apparatuses, for example when you include another restroom the current pipes framework. On a gravity water framework. Issue with the primary line that keeps running between your home and the city's mains. Now and again, homes require a water pressure promoter pump due to their development, area, or the way that there is no high spot on which to introduce their water tanks. How A Water Pressure Booster Pump Works Most private properties require a straightforward one-line fly pump. Consumable water from the City's supply enters through the pressure controller and into the home's supply line to a pump, which is associated with the water pressure supporter pump. The pump-supported water is maneuvered into the home when a fixture is turned on, and the pressure in the water tank drops to draw more water from the City's supply line. This thus helps the pressure in the sponsor tank once more. Much of the time, the water pressure promoter pump will be set to give 30-50 psi water pressure. Water Pressure Booster Pumps For Multi-family Buildings Supporter pumps are regularly introduced on the upper floors of multi-family private structures with a specific end goal to enhance the water pressure for the occupants on the upper floors. Contingent upon the tallness of the building, the pump may either be introduced on ground level, or on one of the upper floors. Introducing a Water Pressure Booster Pump 1. Test the pressure The initial step to introducing your water pressure supporter pump, is to test the water pressure by appending a gage to one of the outside nozzles. 2. Pressurize the tank Before introducing the tank, first pressurize it as per the guidelines in the manual. 3. Deplete the framework Open the most elevated fixture in the home, and additionally an outside nozzle, and afterward stop your fundamental water supply valve. 4. Discover an area Pick an establishment area in a warm spot in your home, which never drops underneath solidifying temperature. 5. Make a sidestep Next, you have to make sidestep on the admission line, which will permit the water to sidestep the water pressure promoter pump if need be. Open every one of the valves before fastening the framework into place. 6. Introduce valves Think about introducing as a reverse valve on the unit, and patch the connectors into place before interfacing the admission line onto the check valve. When you have introduced the pressure help valve, introduce the pressure guage. 7. Benefit your water lines Presently check every one of the associations with guarantee there are no breaks. Open the sidestep valve and the most noteworthy spigot in the home so as to discharge any developed air that might be caught in the water lines. In the wake of closing down sidestep; open your administration valve to permit water to move through the unit. 8. Supply power to the unit Open the unit's get to cover with the goal that you can append the electrical wires to the pressure switch. When you have associated and fixed the wires, you can supplant the cover over the unit and physically modify the unit's pressure. That is it! It's that simple to introduce a water pressure booster pump. 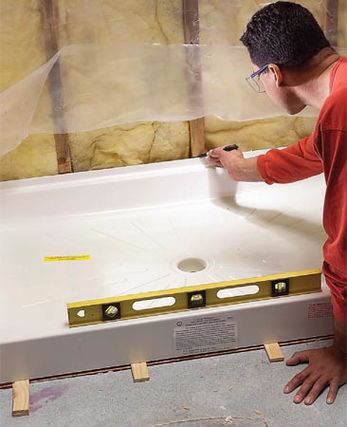 The entire thought behind a 1 piece shower slow down is no joints, no releases, isn't that so? Off-base! Where there is water, it will spill! At the end of the day we see that uncalled for establishment strategies can bring about a water spilling issue. There are two or three figures that enter and add to releasing, how about we talk about them. The less costly shower bases are more slender and tend to flex when you move around on the shower floor and since the deplete in these units is really a grinding fit framework which takes into consideration some development water can leak through this territory and cause an issue. The erosion fit is really a smart thought in light of the fact that there will dependably be an alternate rate of development between the shower base, the auxiliary floor, and the deplete funneling. The deplete pipe for the shower is typically a 1 ½" or 2" PVC pipe that sneaks past an elastic sleeve appended to the base of the shower base. The issue for this situation is that the floor of the shower unit really flexes due to the absence of support from the Best Shower Pan System. The best possible technique for introducing the shower container is to place it in a "bed" of mortar or comparable acting item that will successfully support it and keep it from moving. My most loved item to do this is shower froth for several reasons. It makes the "bed" yet it additionally stifles the sound and further goes about as a protector so as not to direct cool through to the base itself. You should dry fit the shower base first to ensure everything lines up. When you set it in the froth you won't get it go down. To figure the thickness of the "bed" you have to lay the shower construct topsy turvy in light of cover or some other delicate surface as not to scratch it. Put a straight edge or level over the base and measure down to the floor of the unit. Include about ¾" to that estimation to get the thickness of the bed you have to put down. When you have finished your dry fit you are prepared to lay your "bed" down and lay your base into it. Basically shower the froth down on the floor and when it is developed to the wanted stature and scope (by and large half of the aggregate range) lay the base into it. Press solidly, yet don't venture into it or push down forcefully or you will bring about a crevice to frame between the base and the "bed" once the weight is discharged. Abandon it sit for the suggested drying time on the "bed" item you have utilized and you are ready. Alright fine John, yet mine is as of now introduced; what would I be able to do now to keep it from spilling? Here is an answer that has worked in the past to tackle the issue. Expel the deplete entryway, ordinarily snaps in and out, despite the fact that there might be a tighten holding it put. Clean the territory around the joint between the fiberglass base and the elastic gasket. You may need to utilize a putty cut. At that point wipe it clean with nail clean remover, or other degreaser kind of more clean. Be cautious when utilizing a few items as they can stain fiberglass or PVC. Presently utilizing an electric lamp, investigate deplete, not very far down you will see the real deplete pipe itself. More than likely it will resemble a white ring around 3/16" thick. Keep looking painstakingly to the outside of this ring and you can see the elastic sleeve just to the outside of it. Clean the top edge of the pipe and the sleeve ideal above it. Utilizing somewhere in the range of 100% silicone, I suggest GE mark; run a globule around the top edge of the pipe onto the sleeve and another dot on the top where the gasket meets the base. Dampen your finger with a little water and smooth out the globule, not all that much, simply ensure it is fixed the distance around and that you have abandoned it around 1/8" thick. Immaculate silicone will stay adaptable when it dries, which will take into account the slight development that can bring about holes. Give it a chance to dry for the suggested time and snap deplete in and you are ready. Something else you can do in the event that you have admittance to the base of the floor under the shower, you can bore a couple straw size gaps under the base, be exceptionally cautious you don't penetrate through the base, and utilizing a splash froth item, put some froth under the shower base. Try not to stroll on or utilize the shower until the froth has totally set, of your work will have been in vain. These repair techniques will take care of your issue and give you numerous years of a dry washroom. 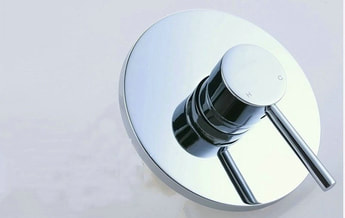 Normally, shower valves are sold in either a one-handle or two-handle plan. Among the two, the one-handle shower valve is maybe the most prevalent. This is essentially on account of the way that the one-handle configuration offers clients with snappy temperature and volume conformists by simply utilizing one valve. In the interim, the two handle shower valve is likewise turning out to be progressively main stream nowadays. They are the typical selection of mortgage holders who are into a more conventional look. In fact, valves are accessible in three sorts - the general, thermostatic, and weight adjusting. Consistent valves are the least expensive among the three. They are not fit for managing water temperature and even the water weight. In the event that you utilize this sort of valve, odds are, the point at which somebody flushes the latrine, a burst of high temp water will leave the shower heads (which can be extremely risky as this can singe your skin). This expressed situation basically infers that you don't have any control over the stream of hot and cool water inside your funneling associations. In this way, don't be astounded if a frosty burst of water all of a sudden leaves the shower as you wash up, in light of the fact that presumably somebody is utilizing boiling point water some place as a part of the house. To anticipate such circumstance, the utilization of weight adjusting valves is suggested. This effective shower control consequently alters the progressions inside the temperature and weight of water so you won't unintentionally burn yourself. They are a more solid choice when contrasted with the normal valve. In the interim, the thermostatic valve is ideal for the individuals who need full control over the temperature and weight of their shower. These valves are prepared to do adequately measuring and managing water temperature. When you have set the valve as indicated by your sought temperature, you are guaranteed that it will keep up a similar temperature unless you design its settings once more. Not at all like the two past models, have thermostatic valves included two controls. Aside from that, shower valves can likewise be modified to incorporate extra components, for example, body splashes and handheld showers. They can be sold independently or as a part of the shower framework. Make sure to ask the sales representative on the accessible alternatives so you'd know whether you can spare progressively on the off chance that you buy a shower framework that is as of now furnish with the Best Shower Mixer Valve or it will be more functional to get it independently. 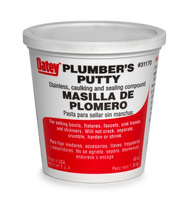 As water holes are the most well-known parts of pipes work, handymen putty is a standout amongst the most essential things in a plumber's tool compartment. Utilized as a part of the establishment of depletes funnels, sinks, and valves, plumber's putty will guarantee a watertight seal. Giving that the putty is relaxed before utilize, it's extraordinarily adaptable and flexible surface empowers handymen or DIY aficionados to apply the putty generally effectively. Handymen putty is cheap, promptly accessible from most plumber stores, and is a urgent resource in giving quality pipes work. Step 1 - Clean the Fittings Before you begin to utilize plumber's putty, dependably guarantee you have wiped clean the region you will be dealing with a perfect, moist fabric. Modest particles of earth and tidy which are not unmistakable to the human eye may bring about sporadic and potholed putty which may at last make water spill through the seal. Step 2 - Apply Heat Warmth is the essential component required for plumber's putty to work adequately. Attempting to utilize the putty when it is too hard will demonstrate a practically incomprehensible errand. Warm your hands on a radiator or rub them together and roll the substance in both hands for a few minutes. Handymen and DIYers who don't diminish putty preceding use are confronted with an a great deal more troublesome process. Step 3 - Make a Snake Shape Form the plumber's putty, similar to you are trim demonstrating dirt, into a long, thin snake shape which ought to be smooth and delicate in surface. Attempt to roll the putty into the wanted size expected to seal a fitting. Step 4 - Apply the Plumber's Putty Plumber's putty is utilized to make seals around fixtures and channels. Delicately guide the putty into a ring that matches the boundary of deplete or base of the spigot installation. Fit deplete or installation into its fitting spot and this will guarantee a watertight fit and farthest point the odds of having a hole. You ought to never utilize plumber's putty to seal joints between strung funnels, metal or plastic, or to concrete together non-strung plastic channeling. Consider options, for example, Teflon tape for fixing joints, or PVC groundwork and concrete for connecting plastic funnels. Step 5 - Wipe off Excess Putty When you apply the substance, overabundance putty will definitely overflow out. It might sound self-evident; however make sure to wipe off any abundance plumber's putty with your second perfect, clammy fabric before the material really dries. Leaving the overabundance putty to dry on a fitting will demonstrate hard to expel and if left unattended, it won't just look unattractive however it might likewise hamper the adequacy and nature of the pipes work. Step 6 - Let the Putty Dry Try not to be over energetic in experimenting with your pipes work by running water before the plumber's putty is dry. By delicately goading the substance with your finger a few hours in the wake of applying it, you can choose whether it is sufficiently dry to be sheltered to utilize. Untimely utilize may bring about the seal to break and the entire procedure should be rehashed. Albeit, the Best Plumbers Putty is a compelling, economical, and simple approach to introduce spigots and depletes and seal spills, it can bring about an insignificant measure of re-coloring to encompassing regions like white pantry fronts or drawers, so be mindful so as to monitor application. In the event that you are stressed over creating unattractive stains, silicone caulk can be utilized as a contrasting option to plumber's putty.  A few people want to put their toothbrushes in mugs, however in the long run they'll locate a dim blend of past plaque and old water sitting at the base, sullying the tip of the handle. That is a well known decision, beyond any doubt, however clearly there are other toothbrush show alternatives that won't prompt to inquisitively shaded standing water, isn't that so? All things considered a few people have worked in; formed toothbrush holders as a piece of their washroom vanity, however very regularly toothbrush handles are too thick for the un-moving toothbrush opening mold. I've by and by observed numerous toothbrushes tumble to their inconvenient passing on account of an as well little to-fit toothbrush forming. How about investigate some more choices. In spite of the fact that uncommon, it's been reported that every so often somebody will put a paper towel around the leader of the toothbrush, going about as a steel drapery to germs and grime. My question is, does the paper towel get changed without fail? Suspicious. That is, evidently, net - and presumably grosser than had there been no paper towel included. Proceeding onward. A few people surmise that the plastic, snap-cinch top that accompanies numerous toothbrushes with the objective of lodging the sensitive toothbrush abounds is a smart thought. Off-base. This lone chokes out abounds and breeds sodden conditions quickened germs. Keep in mind when we were discussing the baffling water down at the base of your toothbrush holding glass? Well envision that same water on the leader of your toothbrush...yeah, it's that gross. Consider the possibility that there was some kind of toothbrush stand that not just held your toothbrush solidly upright and out of damages way, additionally looked sufficiently appealing to show out in the open. That item has, truth be told, arrived. Today you can discover quality toothbrush stands and holders that can even serve as a place to keep your razor, or whatever other toiletry thing you require vertical stockpiling for. Finding remains for your toothbrush is, really, more indispensable than you may might suspect. The germs that gather on a toothbrush when they are not put away appropriately, or are liable to warm, clammy conditions can be enormous in number. Putting away your toothbrush, or even razor, in a dry, minimal place is perfect for keeping your lavatory devices their freshest. At the point when thinking about an approach to legitimately store your toothbrush, as trifling as it might sound, you might need to give it more than one minute of thought. Best Toothbrush Stands have made some amazing progress from simply water filled capacity mugs and plastic swarm tops. In this way, demonstrate toothbrush off and keep it off the floor! 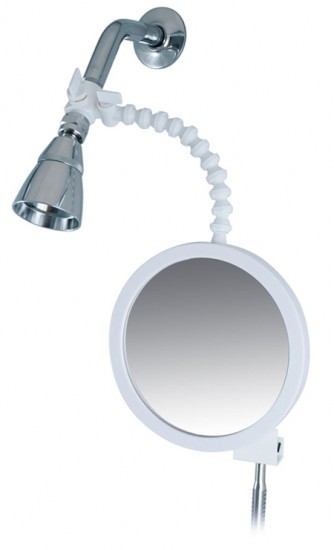 Fog Free Shower Mirror for bathroom mirrors in homes is well known these days with the further improvement of innovation. The innovation in our fog free mirrors keeps it from steaming up amid hot steam shower. Giving you an absolutely fog free mirror while shaving, expelling make-up, and finishing other cleanliness undertakings. Is it true that you are sick of a foggy reflecting in the bathroom? Make fogginess a relic of days gone by with a fog free mirror! Per used on to discover more. What Is A Fog Free Mirror? A fog free mirror is a warmth cushion that prevents your mirrors from turning into all fogged up because of steam from the shower or shower. No more do you need to wipe down the mirror with a towel or sit tight for it to clear before shaving, applying cosmetics, or doing other prepping assignments. Utilizing Fog Free Mirrors Fogless shower mirror is to a great degree thin and are intended to be mounted to the back of a divider hung reflect. They are for the most part cement, permitting you to just stick them on. The cushion is associated with the restroom's light change or to a transformer on the off chance that you settle on a 12 volt display. You may require a circuit repairman to wire the warmth cushions in for you. They keep the reflect clear by warming the reflect surface to over the encompassing temperature of the lavatory, preventing buildup from framing on the mirror's surface and fogging it up. In any case, the warmth is low and uniformly conveyed, so there is no harm to the mirror itself, and no danger of you smoldering yourself on the mirror. Fog Free Mirror – A Cost Efficient Choice You can apply a warmth cushion to your reflect or you can put more than one on the off chance that you have a vast reflected territory. It is prescribed that you pick a cushion that is marginally littler than the aggregate range of your mirror. Fog free mirror is cost productive to keep running, as the biggest cushion doesn't utilize any more power than a 60 watt light. On the off chance that you run the cushion for one hour a day, it ought to just cost you a matter of pennies to utilize every week! 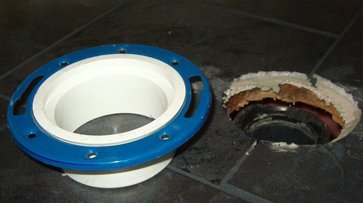 Every so often, having some jack of all trades aptitudes can spare you cash extra minutes, also the way that occasionally, off circumstances happen at any rate time you expect it and you need to depend on yourself. On the off chance that your do-it-without anyone's help test is to expel your Best Closet Flange from a deplete pipe soundly, you are in good fortune. Here, you will discover a stage to-step manual for prevail with regards to settling a toilet dive issue. A can or storage room flange is the association between the toilet and the deplete pipe. It can be a plastic or metal fitting mounted on the deplete pipe and is appended to the can. Expelling it is justified if water is spilling from the base of the can and flooding the bathroom floor or on the off chance that you have to supplant the toilet bowl with another one. Well ordered Procedure 1. Before doing anything, see to it that you have stopped the water valve and detached the supply line. After this is done, you can now evacuate the jolts that associate the toilet bowl from the flange. The can be very overwhelming so you might need to evacuate the front of the water tank first or separate the tank from the bowl. 2. When you have unbolted the toilet from the flange, your next stride is to clean it to evacuate the wax by utilizing a putty cut and disposing of it on a bit of old daily paper. You can likewise utilize cleanser to wash it altogether and wipe the rest of the wax on the flange with a towel. Bear in mind to clean the base part of the bowl and in addition the washroom floor as this can be untidy. 3. Your next stride is to unscrew the flange from the sewer pipe. In the event that you don't have the substitution and need to get another one, you can quantify the distance across of the pipe or even better, take a photo of the flange utilizing your cell phone and convey it with you to the tool shop Note: If the flange is solidified on PVC pipe, you may need to utilize a pipe cutter to evacuate the flange. 1. On the off chance that the flange has broken pieces, you can utilize a spanner flange to settle it. What you need to do is place the spanner flange under the harmed flange and screw it rapidly and fix it. It additionally balances out the current flange. Furthermore, in situations where you just need to supplant the flange neckline, you can settle on a repair ring to take care of the issue. A repair ring is intended to fit the neckline and is made of thin metal. This will keep water from spilling. 2. In the event that you have to expel extremely harmed flange collars, the plain old sledge and etch are the devices you should expel the cast-press flanges from the gathering. 3. Since you have evacuated the broken flange, you can now supplant it with another one. You can go for a decreased flange as it can be effectively connected by embeddings it to the deplete pipe and contorting it. As this is being done, the elastic seal on the flange will secure the new toilet flange. Evacuating a closet flange can be a dreary employment however it should be possible. With the correct instruments and parts in addition to a method that is anything but difficult to tail, you can settle a toilet flange issue.  Potty training is a tremendous turning point for your kid, and likely an appreciated alleviation to guardians and their wallets. It would be decent and perhaps less demanding if there was one, set technique to potty prepare your kid. Yet, as most different things doing with your kid – you have a couple of choices to the extent potty training goes. One of the choices you get the chance to make about potty training is whether to potty prepare utilizing a potty seat, or a can mentor. There are a couple of contrasts between the two and both techniques have their pluses and minuses. A potty seat with Child Toilet Seat Cover is a small potty fabricated only for your little one. They come in a wide range of shapes and sizes. Some are straightforward, simply the pot, while some have shrieks and chimes included – actually. A few potties are customized to play music or light up or accomplish something fun when your little child goes potty in them. Here's a decent combination of potty seats you can look at. A Toilet Trainer is somewhat not quite the same as a potty seat in that it fits over the family latrine. Most latrine mentors comprise of a seat, worked to fit your little one's littler fanny (so they don't fall in!) and they can be joined to or set on a general can situate. Yet, similar to potty seats, latrine coaches have various diverse alternatives too – hues, measure, padding, and so on. The fortunate thing about potty seats is that they are assembled particularly for small tots. They are simple for them to utilize, and the baby doesn't have the danger of tumbling off the potty seat (unless they nod off on the pot!). A ton of children appreciate having their own particular somewhat little potty, it makes them feel essential to have one particularly for themselves. One of the issues with potty training on a potty seat is that your youngster may just need to utilize their potty. There may be times when you're out at a companion's home and don't have their potty with you. They may be reluctant to utilize the enormous latrine when their potty isn't around. Not just that – there's additionally the tidy up included. You're most likely accustomed to it at this point having put in two years working with diapers – yet on the other hand, you've put in two years tidying up crap! Can mentors are great since they take into account the tyke to wind up distinctly used to utilizing a standard estimated latrine. There is no move period required after you've potty prepared your kid. They definitely know how to utilize it. Furthermore – it flushes! Furthermore, that is the minute we've all been sitting tight for. Then again, you should be additional watchful when utilizing a can mentor as the youngster will be higher up than if they were all alone potty seat. Numerous kids will require some kind of stool too to get up to the huge latrine. What's more, keep in mind to lift it up when you need to utilize the toilet! There are a lot of alternatives with regards to picking a potty seat or can coach – as should be obvious at the Potty Training Store. There are likewise many preferences and inconveniences to both. In any case, – guardians have been fruitful with both – so don't stress. What you have to do, is choose which of the two will work best for your little child and you. |
Archives
February 2017
Categories |
 RSS Feed
